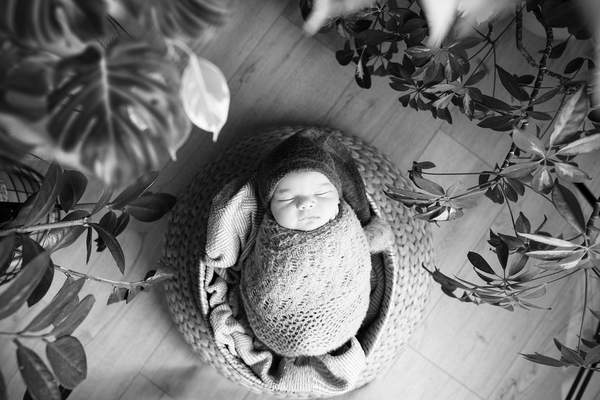
Good newborn pictures rarely depend on expensive lights. More often, the difference between a soft, detailed photograph and a harsh, washed-out one is where you place your baby in relation to a window. A few small adjustments can flatter delicate features, preserve natural skin tones, and make an ordinary corner of your home look beautifully calm.
These newborn photo lighting tips at home are designed for real life: unpredictable naps, limited space, and a phone or camera you already own. You do not need a studio setup. You need gentle daylight, a safe place for your baby, and a willingness to move yourself instead of constantly repositioning them.
Start With the Quality of Light, Not the Size of the Window
The most forgiving newborn photography lighting is soft and directional. Soft light creates gradual transitions between bright and shaded areas, so cheeks look rounded without casting hard lines across the nose or eyes. Direction gives the photograph shape; light coming from everywhere can make a face look flat.
Choose a window receiving indirect daylight. An overcast sky often acts like a giant diffuser. If strong sun streams through the glass, wait until the beam moves away or soften it with a sheer curtain already secured safely out of reach. Never put a newborn in direct sunshine simply to make the picture brighter.
Position Your Baby So the Light Falls Across the Face
For natural light newborn photos, imagine the window as one large lamp. Begin with the baby’s head turned slightly toward that light and the window off to one side of your camera. Look for a softly illuminated forehead and cheek, with a mild shadow on the opposite side.
You can experiment with an angle of roughly 30 to 45 degrees between the direction of the window light and the baby’s face. It is a starting point, not a rule. If one eye disappears into darkness, shift your own shooting position or change the direction of the available light rather than repeatedly moving a settled newborn.
A Simple Living-Room Example
Imagine a late-morning window beside the sofa, but the sunlight itself falls across the far wall. Place a safety-approved bassinet a comfortable distance from the glass, away from blind cords, drafts, and direct rays. With your baby lying on their back in a clear sleep space, photograph from above at a safe angle while standing securely on the floor. The window gently lights one side of the face, and the opposite cheek keeps a little natural depth.
Take a test picture, then move your phone a few inches to the side. Compare the shadow under the nose and the brightness of the eyes. This can improve the picture without disturbing the baby.
Control Shadows With Objects You Already Have
Shadow is not the enemy. A little shading helps show the curve of tiny fingers, eyelashes, and cheeks. Problems arise when the contrast is so strong that one side of the face becomes featureless.
Try holding a white card or foam board on the darker side, outside your baby’s reach. It reflects some window light back toward the face. Have another adult hold it securely, or position it so it cannot tip or fall. A pale wall may offer enough reflection without any equipment.
If the result looks unnaturally flat, move the reflector farther away. For window light baby photos, subtle fill usually looks more believable than eliminating every shadow. Turn off unnecessary warm lamps to avoid mixed color casts.
Choose the Right Time for Your Home
There is no universal best hour for home photo lighting. The useful time depends on which direction your windows face, nearby buildings, weather, and your baby’s routine. A bright but cloud-covered afternoon may be easier than a sunny morning with sharp beams.
Spend one day noticing when your preferred room receives even daylight. Then aim for a short session after a feed or change, when your baby is comfortable. Ten relaxed minutes usually give you more usable expressions than an extended session built around perfect lighting.
Make Smartphone Exposure and Color Work for You
With a phone, tap the baby’s nearer eye or face to set focus and exposure. If the forehead or pale clothing looks glaringly white, lower the exposure slightly using your camera’s brightness control. Keeping highlight detail is often easier than rescuing clipped bright areas later.
On a camera with manual settings, prioritize a shutter speed fast enough for small movements, use a wide but not extreme aperture, and raise ISO only as needed. A shutter around 1/125 second can be a useful starting point for a mostly still baby, but increase it when little hands are moving. Check that the eye closest to the camera is sharp.
Keep white balance consistent when possible. Daylight settings can help prevent colors from shifting between frames, though changing clouds may require adjustment. Edit gently afterward: restore a little brightness and neutralize an obvious color cast without smoothing away natural newborn skin texture.
Keep the Setup Simple and Safe
Soft window light cannot compensate for an unsafe pose. For sleeping pictures, follow safe-sleep guidance: place your baby on their back on a firm, flat, non-inclined mattress in an approved crib or bassinet, with a fitted sheet and no loose blankets, pillows, or decorative props. Avoid elevated posing surfaces, baskets, and unsupported positions. Stay close and supervise the entire session.
For awake photographs, capture ordinary moments such as a stretch, a yawn, or a hand holding your finger, always with safe support. You may find more inspiration in newborn photo outfit ideas and simple baby milestone photo ideas, but keep accessories away from the face and never trade comfort for a particular image.
Conclusion
Better newborn photos begin with noticing light rather than buying it. Find indirect window daylight, allow a gentle shadow to shape the face, adjust exposure carefully, and work around your baby’s comfort. Small, repeatable choices create photographs that feel bright and natural while preserving the moment as it really happened.
Frequently Asked Questions
What is the best light for newborn pictures at home?
Soft, indirect window daylight is usually the easiest option. It reveals facial detail without the harsh contrast of direct sunlight and works well with a smartphone or a camera.
Should I use flash for newborn photography?
Flash is not essential for attractive newborn pictures and can interrupt a peaceful session. Start with available daylight instead. If your room is too dark, move to a brighter spot rather than putting a strong light close to the baby’s face.
How do I prevent dark shadows in window light baby photos?
Turn the shooting angle toward the window, use a light-colored wall for natural bounce, or have an adult hold a white reflector securely beyond the baby’s reach. Keep some shadow for depth.
Can I take good newborn photos on a cloudy day?
Yes. Clouds often soften outdoor daylight before it reaches your window. The room may be dimmer, so steady your phone, focus carefully, and avoid unnecessary camera movement while taking the shot.