Feeding a baby comes with a rhythm of its own. There are sleepy night feeds, half-finished bottles, warm milk, burp cloths, and that small but steady pile of bottles waiting by the sink. For new parents, learning how to clean baby bottles can feel like one more task in an already full day. Still, it is one of those everyday routines that matters more than it first appears.
Baby bottles come into close contact with milk, formula, saliva, and tiny developing immune systems. A bottle that looks clean at a glance can still hold traces of milk inside the nipple, around the collar, or along the bottom edge. When milk residue sits too long, it can create an ideal place for bacteria to grow. That is why proper bottle cleaning is less about being overly cautious and more about building a simple, reliable habit.
The good news is that bottle care does not have to be complicated. Once you understand the basic steps, it becomes a normal part of your feeding routine, almost like washing your hands before preparing a meal.
Why Clean Baby Bottles Carefully
Milk can cling to bottle parts in ways that are easy to miss. Formula and breast milk both contain nutrients, and those same nutrients that feed a baby can also feed bacteria when left sitting at room temperature. This is especially important in the early months, when babies are still developing their natural defenses.
Cleaning baby bottles properly helps remove leftover milk, oils, and germs from every surface. It also keeps nipples clear, prevents unpleasant smells, and helps bottles last longer. A bottle that is rinsed quickly but not fully washed may seem fine for a while, but over time it can develop cloudy patches, sticky residue, or a sour smell.
Parents often ask whether every bottle needs a deep clean every time. In most cases, yes, each used bottle should be taken apart and washed thoroughly after feeding. It may sound like a lot, but leaving bottles for later usually makes the job harder, not easier.
Start by Washing Your Hands
Before handling bottles, it helps to begin with clean hands. This step is simple, but it is easy to skip when the baby is crying or the kitchen feels busy. Wash your hands with soap and water, especially before touching clean bottle parts or preparing milk.
Clean hands reduce the chance of transferring germs to bottles after they have been washed. It is a small habit, but it sets the tone for the whole process. Baby feeding items should be treated a bit like food preparation tools because, in many ways, that is exactly what they are.
Take Every Bottle Apart
One of the most common mistakes parents make is washing the bottle as one piece. Baby bottles have several parts, and milk can hide between them. The bottle, nipple, collar, cap, valve, and any anti-colic pieces should be separated before washing.
This matters because milk often collects in small openings and around rubber or silicone edges. Nipples, in particular, need careful attention because residue can sit inside the tip. If a bottle has a venting system, it may have narrow parts that need extra rinsing.
Taking the bottle apart may feel like an extra step, but it actually makes cleaning easier. Once every piece is separate, you can see what needs attention and avoid leaving hidden residue behind.
Rinse Bottles Soon After Feeding
If possible, rinse the bottle parts soon after your baby finishes feeding. A quick rinse under running water helps remove fresh milk before it dries. Dried milk is harder to clean and can leave a film on the bottle surface.
This does not mean you must fully wash every bottle the second feeding ends. Real life does not always work that neatly. But even a fast rinse can make a big difference. If you are away from home, empty the bottle and rinse it when clean water is available. Then wash it properly once you are back.
Try not to leave used bottles sitting in a diaper bag or warm room for long periods. Warm, closed spaces can make old milk smell unpleasant very quickly.
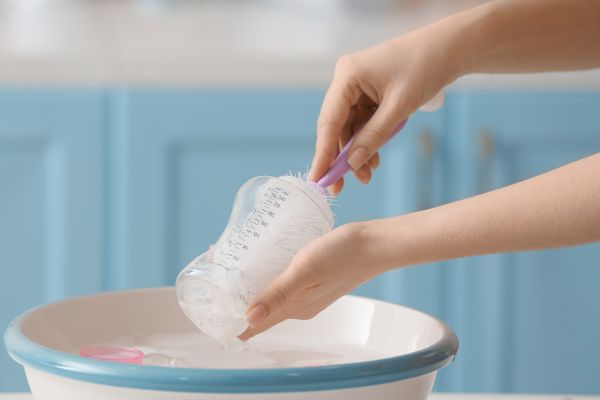
Washing Baby Bottles by Hand
Hand washing is a dependable way to clean baby bottles when done carefully. Use hot water and dish soap, then scrub each piece with a clean bottle brush. A long brush helps reach the bottom and sides of the bottle, while a smaller nipple brush can clean the inside of nipples and tight areas.
Pay close attention to corners, threads, and rings where the bottle screws together. These areas often collect milk residue. After scrubbing, rinse every part thoroughly under running water until no soap remains.
It is best to use a brush that is kept only for baby bottles. Kitchen sponges can carry food particles and germs, so they are not ideal for cleaning infant feeding items. After washing, rinse the brush as well and let it air dry.
Using a Dishwasher Safely
Some baby bottles and parts are dishwasher-safe, which can save time. Always check the bottle manufacturer’s instructions first because not every nipple, valve, or plastic part is made for high heat.
If using a dishwasher, place small parts in a closed basket or mesh dishwasher bag so they do not fall to the bottom. Bottles should be positioned so water can flow through them easily. A hot water cycle and heated drying setting can help clean and dry the parts more effectively.
Even with a dishwasher, it is worth checking nipples and narrow pieces afterward. If you notice any milk residue or cloudiness, wash those pieces again by hand.
Drying Bottles the Right Way
Drying matters almost as much as washing. After cleaning, place bottle parts on a clean drying rack or fresh towel in an area with good airflow. Let them air dry completely before putting them away.
Avoid drying bottle parts with a used kitchen towel. Towels can transfer lint or germs, especially if they have been used for hands, dishes, or counters. Air drying is usually the cleanest and easiest option.
Once the parts are fully dry, store them in a clean, covered place. Reassembling bottles while they are still damp can trap moisture inside, which may encourage musty smells.
When Bottles Need Sterilizing
Cleaning and sterilizing are not the same thing. Cleaning removes milk and visible residue, while sterilizing uses heat or another approved method to reduce germs more thoroughly. Many parents sterilize bottles before first use, especially when the items are new from the package.
Sterilizing may also be recommended for newborns, premature babies, or babies with weaker immune systems. Some families sterilize bottles daily during the early months for extra peace of mind. Others rely on careful washing after the initial sterilizing stage. The right approach can depend on your baby’s age, health, and your healthcare provider’s advice.
Common sterilizing methods include boiling, steam sterilizers, microwave steam bags, or dishwasher sanitize cycles if the bottle parts are suitable. Whatever method you use, make sure every part is already washed first. Sterilizing dirty bottles will not properly remove milk residue.
Keeping Bottle Cleaning Simple
The easiest way to stay on top of bottle cleaning is to create a small system. Keep bottle brushes, soap, and a drying rack in one area. Rinse bottles soon after feeding when possible. Wash in small batches instead of letting everything pile up until the end of the day.
It can also help to have enough bottles for your daily routine without having so many that used ones get forgotten. Too few bottles can make feeding feel stressful, but too many can lead to a sink full of old milk.
Bottle cleaning is not glamorous, and it can feel repetitive. Still, it becomes easier when it is treated as part of feeding rather than a separate chore. Feed, rinse, wash, dry, repeat. Simple habits are often the ones that protect babies best.
Signs a Bottle or Nipple Should Be Replaced
Even well-cleaned bottles do not last forever. Check nipples regularly for cracks, thinning, stickiness, or changes in shape. If milk flows too quickly or the nipple looks damaged, it is time to replace it. Cracks can trap residue and may also affect feeding.
Bottles should be replaced if they become cloudy, scratched, cracked, or difficult to clean. Deep scratches can hold residue, especially in plastic bottles. Any part that smells sour even after washing should be inspected carefully and replaced if needed.
Keeping bottles in good condition makes cleaning easier and feeding safer.
Conclusion
Learning how to clean baby bottles properly is really about creating a calm, consistent routine. Each step has a purpose: washing hands, taking the bottle apart, rinsing away milk, scrubbing carefully, drying fully, and sterilizing when needed. None of it has to be rushed or complicated, but it does need attention.
In the middle of busy baby days, bottle cleaning may feel like a small background task. Yet it quietly supports your baby’s health with every feed. A clean bottle means one less thing to worry about, and for parents, that kind of peace is worth a lot. With practice, the process becomes second nature, just another steady act of care in the long, tender work of raising a baby.